


Disclosure: This post may contain affiliate links and I may make a small commission on items purchased through links in this post at no extra cost to you. You can find out more in my Disclaimer.
LEARN TO KNIT CUFF-DOWN SOCKS
In this step-by-step tutorial, I will show you how to knit a pair of very basic socks. This article is useful if you are a beginner or want to try out a different sock knitting technique.
This classic pair is knit cuff-down in the round with double-pointed needles and will fit size 37-38 (US 6.5-7.5/ UK 4-5).
Gauge: 10×10 cm ( 4×4 inches) 28 stitches x 40 rows
RELATED POSTS:
- What is the best yarn for knitting socks?
- Elevation yoga socks | Free knitting pattern
- Lavender Lane socks | Knitting pattern
- Sunset Safari socks | Knitting pattern
- How to start knitting?
PIN this for later!

Supplies
Yarn: 1 skein of fingering weight yarn. I recommend using superwash sock yarn, you can read about choosing yarn for socks HERE .
I used superwash wool by Alize, it’s 75% Wool, 25% Polyamide.
Needles: a set of five 2.5mm double point needles (US 1.5)
Stitch Markers (optional)
Sock Blockers (optional)
Abbreviations
K – knit
P – purl
S – slip
K2tog – knit 2 stitches together
P2tog – purl 2 stitches together
Ssk – slip, slip, knit 2 stitches together
Ws – wrong side
Rs – right side
* * – Repeat from * to * until the end of the row or the stated number of times
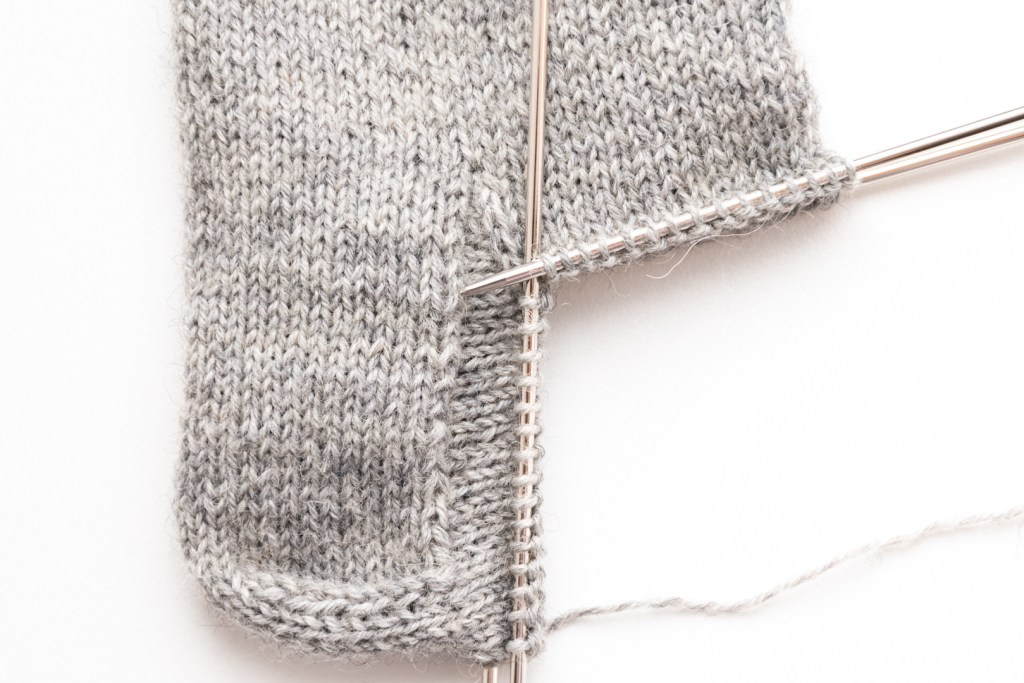
Cuff
Cast on 60 stitches with the Long Tail Cast On method or the one you prefer.
TIP: Cast stitches onto 2 needles – this way the ribbing will be more elastic. You can also go up a needle size.

Divide the stitches evenly between 4 needles (15 stitches on each needle).

Work *K2, P2* ribbing for 5-6cm (2-2.5 inches).
Be careful not to twist the stitches starting the first row. Needles are marked with numbers – yarn tail will be on needle one.
TIP: Knit the first 2 stitches using yarn from the ball and the tail to avoid loose stitches. Also, knit the last and the first stitch on a needle a little tighter.

Leg
Knit in stockinette for another 5-6cm (2-2.5inches).

Heel flap
The heel flap is worked on half of all stitches (in this case that is 30 stitches).
After you have finished the leg, turn your work to the wrong side and start knitting back and forth on needle 3 and 4 (needles 1 and 2 are on hold for a while). You can put stitches from needles 3 and 4 onto one needle – it will be more convenient. You might also want to put markers on the first and last stitches of the heel flap.
Row 1 (WS): S1 purlwise, P29
Row 2 (RS): S1 knitwise, K29
Work rows 1 and 2 15 times (a total of 30 rows).

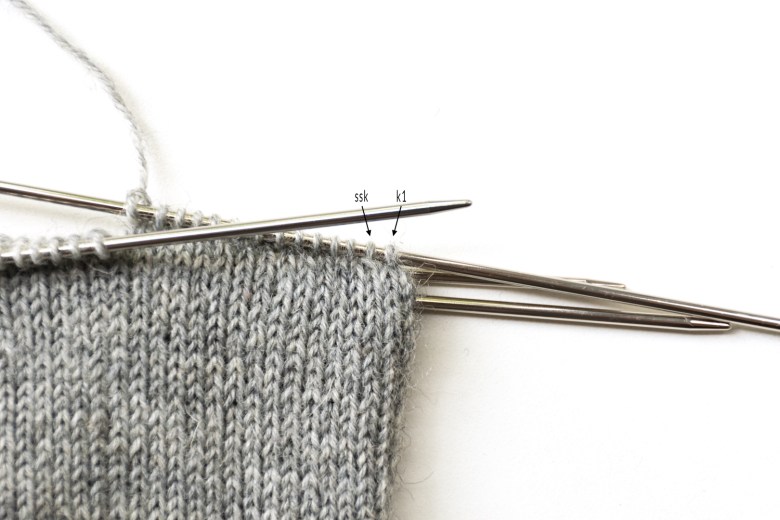
Heel turn
The heel turn is worked on one needle in the short row method back and forth – on the same needle you were knitting the heel flap.
To form the heel we will need to decrease the number of stitches. In our mind, we need to split these 30 stitches into 3 equal parts (you might want to put markers between the parts) – that is 10 stitches in each part. We will be decreasing stitches in the left and right parts until only the center part (containing 10 stitches) remains. In each row, we are going to knit the last stitch from the center part together with the first stitch from either left or right side and we will be turning our work to the other side before we have finished the row. Turn your work to the wrong side and start decreasing.
Row 1 (WS): S1 purlwise, P18, P2tog, turn
Row 2 (RS): S1 knitwise, K8, ssk, turn
Row 3 (WS): S1 purlwise, P8, P2tog, turn
Row 4 (RS): S1 knitwise, K8, ssk, turn


Continue working rows 3 and 4 until you will have only 10 stitches left.

Decrease result – 10 stitches on the needle
Heel Gusset
At this point, you have 10 stitches on one needle, the right side is facing you. Now we are going to pick up the stitches along the side of our heel flap. We will pick up slip stitches one by one with our needle holding 10 stitches. Just insert the needle into the first stitch from the heel flap, grab the yarn and pull through – that’s a stitch.


Inserting the needle into the first stitch from the heel flap

Pick up 16 additional stitches from the heel flap. You will have 26 stitches on one needle (10 stitches + 16 stitches). This is the result you should have:

We are back to knitting in the round – you will see, that needles 1 and 2 are next in line to be worked – just knit the next 30 stitches (15 on needle 1 and 15 on needle 2). Now the other side of the heel flap is facing you – we need to pick up the same amount of stitches ( 16 stitches) from this side too. Take the needle number 3 that has no stitches at all and was on hold for all this time and pick up 16 stitches.
Now you have all 4 needles and we need to get back to 15 stitches on each needle. First, let’s move half of the heel’s stitches from the needle 4 (total – 10 stitches, half – 5) to the needle 3 – knit the first 5 stitches with it. This is how the heel will look:

Heel decrease
This is how our sock looks like:
Needle 1: 15 stitches
Needle 2: 15 stitches
Needle 3: 21 stitch
Needle 4: 21 stitch

We will be decreasing the number of stitches on needle 3 and 4 (from 21 to original 15). Knit 1 round and start decreasing:
Needle 4: Knit before 2 last stitches, k2tog
Needle 1 and 2: Knit
Needle 3: Ssk, knit

Repeat this pattern until you will have 15 stitches on each needle:
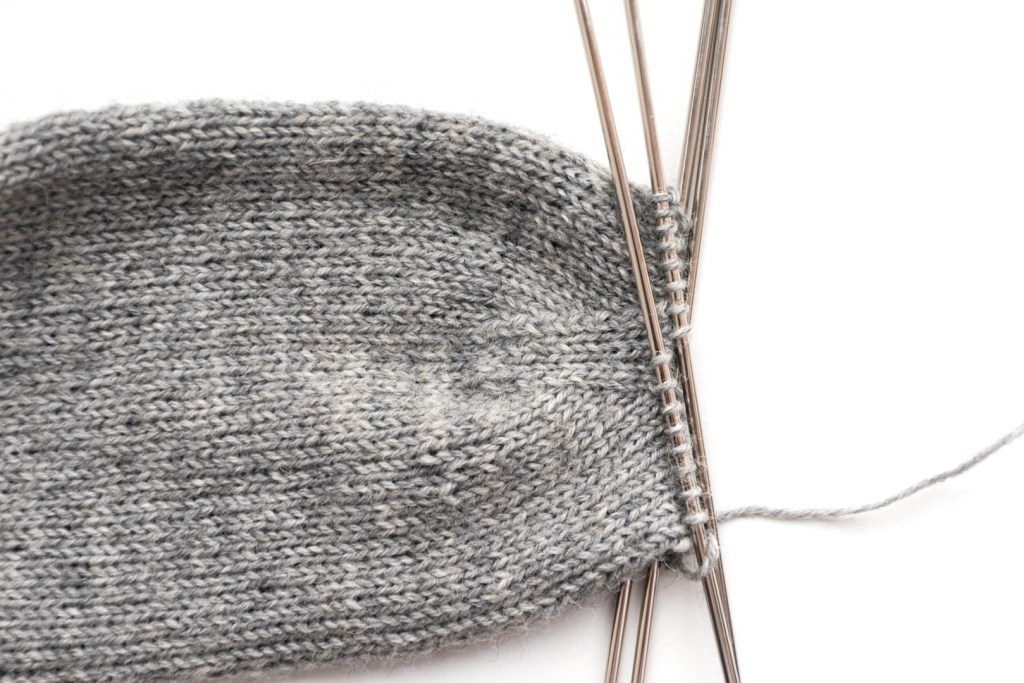
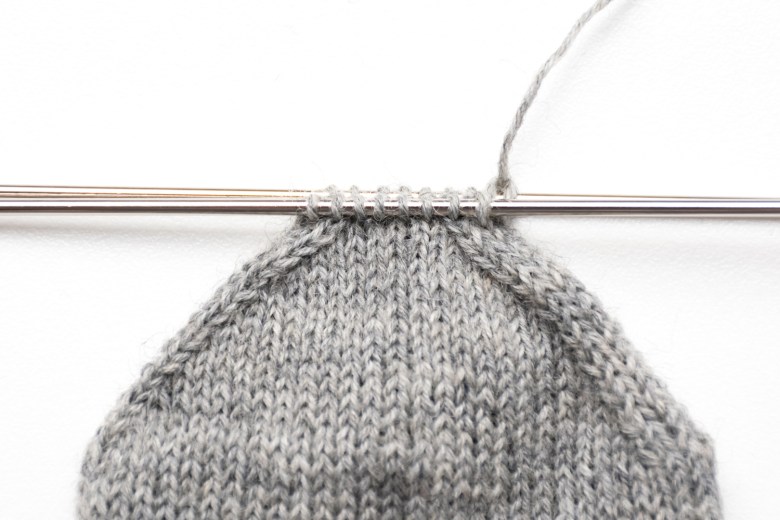
Continue knitting in stockinette in the round until the foot of the sock is approximately 19.5cm (7.7 inches) or 4.5cm (1.8 inches) shorter than your foot length.

Toe decrease
When you are happy with the length of the sock you can start shaping the toe. To do so, we are going to be knitting 2 stitches together on each needle in each 2nd round until we have half of the stitches on our needles – a total of 32 stitches, 8 stitches on each needle.
Technically half of all stitches would be 30, but we need to have an even amount of stitches on all 4 needles, so we are going with 32.
Row 1:
Needle 1: K1, ssk, knit to end
Needle 2: Knit before 3 last stitches, k2tog, k1
Needle 3: K1, ssk, knit to end
Needle 4: Knit before 3 last stitches, k2tog, k1
Row 2:
Knit across
Repeat this pattern until you have 8 stitches on each needle:

Continue decreasing stitches in EACH round until you have 4 stitches on each needle:
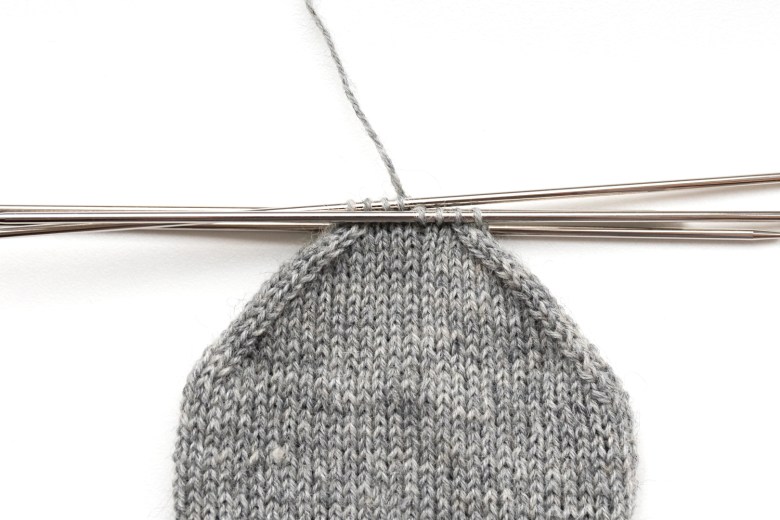
Distribute 8 top stitches on one needle and 8 bottom stitches on another one:
Finish off with Kitchener Stitch.

Yay, a finished sock! Trust me, when you will get the hang of the process, it will be a fast knit (depends on your chosen pattern, of course). And now back to work – the second sock ain’t gonna knit itself!

I hope you enjoyed this sock knitting pattern! Be sure to check out my sock knitting patterns.
Thank you for stopping by,
Mirella!


i have tried to follow your directions for turning the heel, and find that it does not work at all. have you published revised/corrected directions and if so how do i find them>
Hm, the instructions seem to be fine… Can you please explain in a little more detail, where the problem starts? The idea here is to work with half of the stitches only (that’s 2 needles, but it is easier to transfer the stitches on to 1 needle). If we have a total of 60 stitches, we are with 30 now (and turning the work). And then we’re decreasing the stitches, following the pattern (we neede to get from 30 stitches to 10):
Row 1 (WS): S1 purlwise, P18, P2tog, turn
Row 2 (RS): S1 knitwise, K8, ssk, turn
Row 3 (WS): S1 purlwise, P8, P2tog, turn
Row 4 (RS): S1 knitwise, K8, ssk, turn
Hi Mirella. I’m in love with these socks and this pattern. I think I’ve hit a glitch as others may have unfortunately I can’t seem to work through it. These are my first pair and so far going great. I’m at the Heel Turn. I have 30 stitches on one needle. The pattern calls for 1 sl then P18, P 2 TOG and turn. What happens to the rest of the stitches on the needle? (9 st?)
Hi! Yes, working the heel for the 1st time can be tricky, it looks weird at the beginning 🙂
I have tried to make a detailed tutorial here:
https://mirellamoments.com/how-to-knit-a-square-dutch-sock-heel/
So, about those 9 stitches – you just leave them on the second needle, turn your work, and work row 2 (ignore those 9 stitches, you will work the same stitches you have just worked as if those 9 stitches don’t exist). When you will come back to them in row 3 you will purl the LAST stitch from the middle part together with the FIRST stitch of the side part (of those 9 stitches), you will have 8 stitches left, and you’ll turn your work.
The idea here is to decrease the stitches from the side parts by knitting or purling 2 stitches together – 1 from the middle part and 1 from the side part, until there will be only stitches from the middle part left. It goes like this:
10/10/10
9/10/9
8/10/8
7/10/7
… etc.
I hope this helps! If it is not clear -please don’t hesitate to ask questions, I’ll do my best to answer them!
I had a problem with the ssk instruction too, so I did slip one, knit one & pass slipped stitch over & it turned out fine.
Thank you for this written pattern. Do you have it in a vídeo? Thank you
You’re welcome!:) No, sorry, I haven’t made a video tutorial for this one.
hi, mirella – thank you so much! you solved my problem. this is the best heel, but i could only accomplish it on dk and worsted socks, because i had no idea why i was doing each step. you’ve taught us why, and now i can finally knit the best heel ever!
Hi, I’m glad this was useful!
WOW!! This works!! (heel) I focused on your technique and it just flowed into place. Amazing!! You’re a genius. Thank you!!
That’s great, I’m truly glad it worked!🙌 The heel is quite easy to work, but it’s quite hard to explain the technique in writing!
hi, mirella – i learned to knit a plain row in between decrease rows on the gusset, but i notice that you don’t do that. is there a reason that you do your gusset that way?
That’s a great question! I actually do it both ways – sometimes I decrease in every round, sometimes in every other (=with that plain round in between the decreases). Lately, I’ve been decreasing in every other round. In theory, if a person has low arches or it’s a small size, it’s better to decrease in every round, so the sock fits better, but with a standard sock (that is knit in stockinette with fingering-weight yarn), I don’t really see the difference. For larger sizes, it’s always better to decrease in every other round, so the decrease part is a little longer.
For the basic sock pattern, I chose to do the decreases in every round, because it is a little simpler.
Thank you for this excellent tutorial! I have been knitting scarves, shawls and squares for years, always wanting to knit socks. These socks were my first dpn project and took me about a week of daily work. Thanks again!
You’re welcome I’m glad the tutorial was useful!
Help!! Do you have a simple pattern for we people that can’t use 4 needles at one time??!! I try to knit the sock on the round. I can get it to the heel then I can’t get it to work. Thank you. Love the socks you posted.
Hi, if you mean sock pattern, then they are all worked in the round – you could try to watch a tutorial on YouTube on how to knit with 5 needles or could also look up how to use the magic loop method – you use a circular needle instead of DPNs. If you want a simple project to practice knitting, you can check out my headband patterns, that are worked flat with two needles. For example this on uses a simple textured stitch:
https://mirellamoments.com/the-yarrow-headband-knitting-pattern/
Thank you so much for this pattern and the detailed instructions! I’m getting stuck at picking up stitches after the heel turn. I got the turn and got to 10 stitches on one needle. Then, if I pick up stitches to the left, my yarn will end up midway in that row. Should I be picking up on the right instead? I hope I’m explaining it clearly!
Thank you so much!
When you pick up the stitches you also knit them – you insert the needle into the first stitch from the heel flap, grab the yarn and pull it through. This way you have and additional stitch on the needle and the yarn is connected to that last (11th) stitch on the needle. The images in the “Heel Gusset” section show this process step by step.
Hope this helps!
Dear Mirella, It is my first time knitting socks. I’m a bit stuck at the heel turn. I followed your instructions but I get a different outcome. So I am doing row 3 and 4 as instructed.
Row 3 (WS): S1 purlwise, P8, P2tog, turn
Row 4 (RS): S1 knitwise, K8, ssk, turn
One side of the sock, the purl side where I knit 2 together is fine, but then the right side I do not decrease, I only slip those stitches and turn, am I right? No decrease on this line? I did this and I get two different sides to my sock. One side looks like a proper decrease, the other side looks totally different and the whole sock looks out of shape. Am I understanding this rightly? Do I only decrease on the purl side? I would love your advice. Thank you. Agnes
Hi Agnes! You should decrease on both sides -the right (knit) side and the wrong (purl) side. You p2tog on the wrong side (as you did) and you SSK on the right side. SSK (slip, slip, knit) is a left-leaning decrease. You slip two stitches (on by one KNITWISE) on the right needle and return them onto your left needle (now their right legs or at the back of the needle), and you knit them together – insert the needle through the front into both loops and knit them together. Hope this helps!